Elementary Art For January 2018
For January NTI days I would like to do some art At home with the Kids so they Can stay on point with art.
Here are some art projects that students can do at home that will only take a few minuets or a few hours depending on how involved they become.
Snow Flakes:
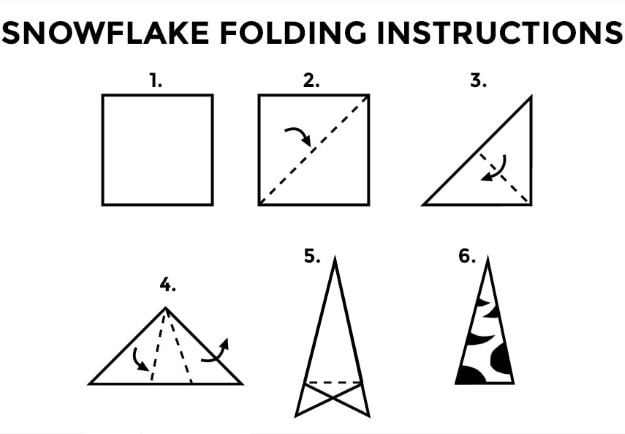
Students will use a regular copy paper or note book paper and create a square by the two following ways:
1. students can Measure the paper from side to side (8.5 inches) and then measure from the top down and make two marks on each side that are 8.5 inches from the top edge down.
Then with a ruler or the edge of a note book draw a straight line and cut off the extra paper at the bottom.
Your should have a square paper.
2. take the paper in front of you and grab a corner top or left, and fold it
to where the two edges of the paper meet evenly.
Then draw a line along the bottom so you can see where you need to
cut your paper.
3 Now that you have cut your paper into a square you can fold your paper
into a triangle and fold it twice more into a triangle 1/3 it's original size.
4 Draw 3-5 shapes that touch the edge of the triangle. Try to make each
shape different in size so that your snow flake looks good. You also want
to make sure that your shapes are not to close or too far apart. Use
a pencil width for each shape.
5. Cut your shapes out and see what you have left.
You may have to try 2-3 times to see how different shapes look.
Use the image below as a guide.
Here are some art projects that students can do at home that will only take a few minuets or a few hours depending on how involved they become.
Snow Flakes:
Students will use a regular copy paper or note book paper and create a square by the two following ways:
1. students can Measure the paper from side to side (8.5 inches) and then measure from the top down and make two marks on each side that are 8.5 inches from the top edge down.
Then with a ruler or the edge of a note book draw a straight line and cut off the extra paper at the bottom.
Your should have a square paper.
2. take the paper in front of you and grab a corner top or left, and fold it
to where the two edges of the paper meet evenly.
Then draw a line along the bottom so you can see where you need to
cut your paper.
3 Now that you have cut your paper into a square you can fold your paper
into a triangle and fold it twice more into a triangle 1/3 it's original size.
4 Draw 3-5 shapes that touch the edge of the triangle. Try to make each
shape different in size so that your snow flake looks good. You also want
to make sure that your shapes are not to close or too far apart. Use
a pencil width for each shape.
5. Cut your shapes out and see what you have left.
You may have to try 2-3 times to see how different shapes look.
Use the image below as a guide.